How to Find Passwords for Known Wi-Fi Networks on Mac in macOS 13 Ventura or Later
So, how does this new macOS 13 feature work? Whenever you connect to a Wi-Fi network, macOS automatically saves your password. Hence, you can keep a track of the stored passwords, easily connect to a network, and even choose to share them with anyone. And if required, you can delete the ones that are no longer needed. Notably, there are multiple ways to check passwords for the previously connected networks. For instance, you can head into the Wi-Fi settings to view passwords or go to the Keychain Access to have a detailed look at all your security codes.
Find Wi-Fi Password for Currently Connected Network on Mac
If all you want is a quick access to the password of the Wi-Fi network you are currently connected to, go through the steps below.
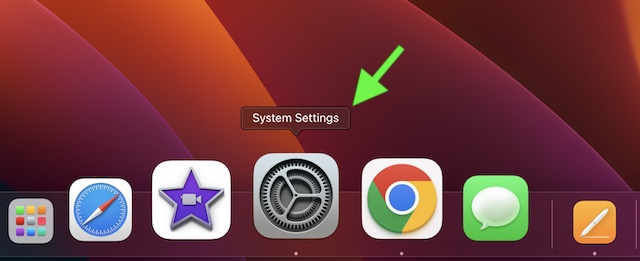
- First off, launch the System Settings app on your Mac running macOS 13 Ventura or later. Or, click on the Apple () symbol in the menu bar and choose System Settings from the dropdown menu.
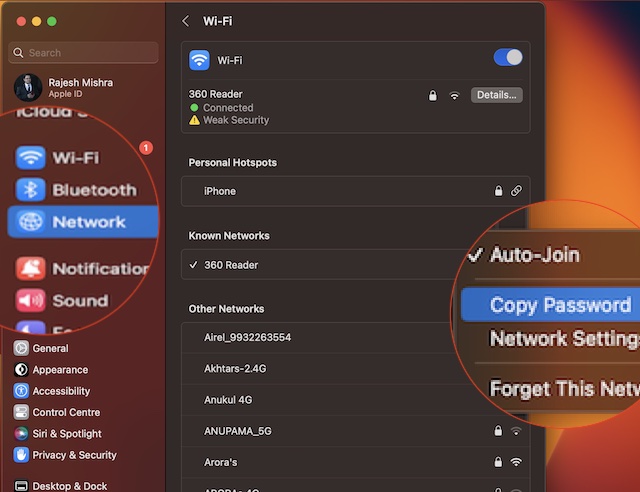
- In the System Settings menu, select Network in the sidebar.
- Next, click on Wi-Fi at the top of the screen.
- Next up, hit the triple-dot icon next to the network you are currently using.
- After that, click on Copy Password in the menu. – You have successfully copied the password to the clipboard. Now, you can open any app like Note and paste the password to view it. And if you want to share it with anyone, simply open Messages, Mail, or any other app and share it as usual.
Check Wi-Fi Passwords for All Previously Connected Networks on Mac
Should you need to have a detailed look at the passwords of the previously connected Wi-Fi networks, there is a way to get it done as well.
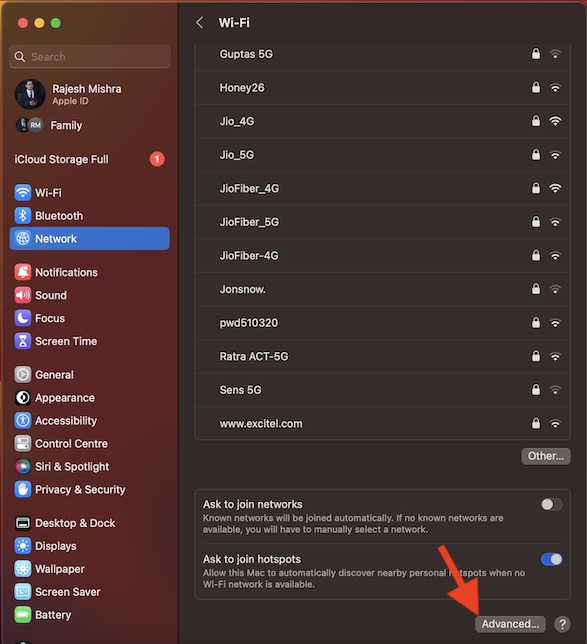
- To get started, open the System Settings app on your Mac and choose Network.
- Next, click on Wi-Fi. After that, scroll down to the bottom and hit the Advanced button.
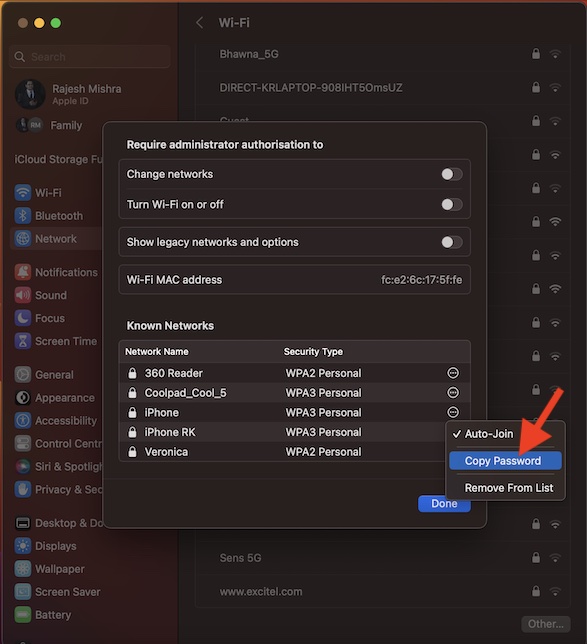
- Here, you can view a long list of known networks.
- Then, hit the triple-down icon next to the network in question and select Copy Password. With the password successfully copied to the clipboard, paste it into a text field or share it with your friends.
View Wi-Fi Passwords for Previously Connected Wi-Fi Networks Using Keychain Access
Interestingly, you can also get the most out of macOS built-in password manager aka Keychain Access to view and manage Wi-Fi passwords.
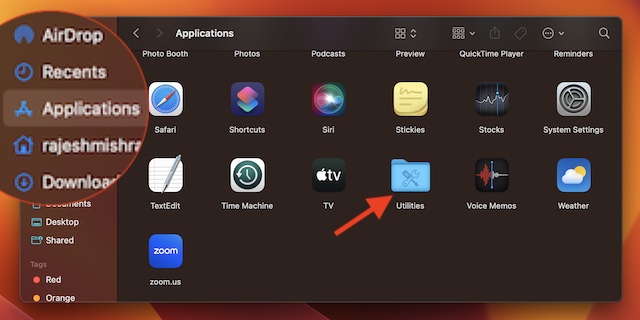
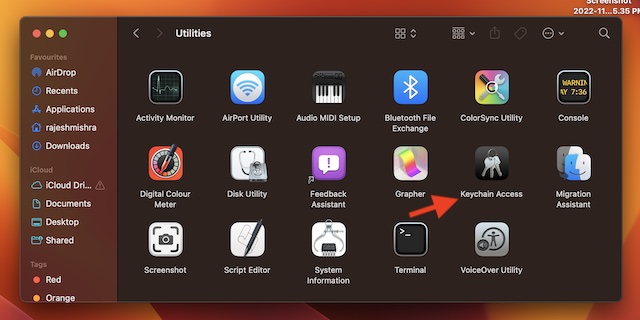
- To begin with, launch the Keychain Access app on your Mac. You can find this app inside the Applications -> Utilities folder. However, the easiest way to find it is through Spotlight Search. Just press the Command+Spacebar keys (or click the Spotlight Search icon at the top right corner of the menu bar)
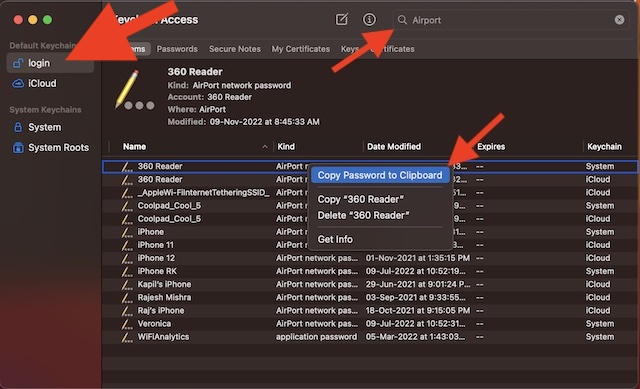
- Now, select the Login option in the sidebar.
- To view a specific network, type the name of the network into the search bar.
- If you want to quickly access all Wi-Fi networks, enter “AirPort” in the search bar.
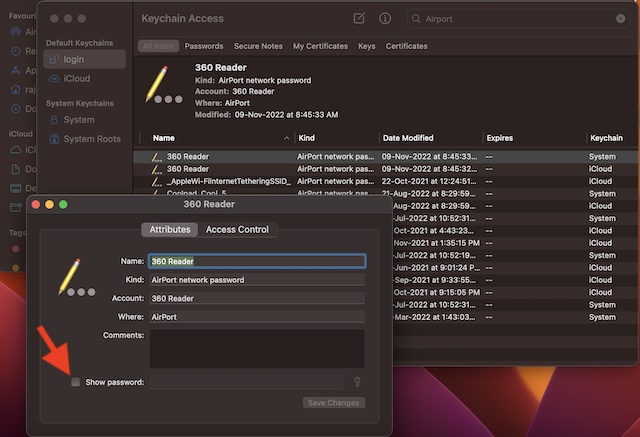
- Now, right-click or Ctrl-click an entry and choose Copy Password to Clipboard in the menu. Another way to do it is to double-click the entry and then tick the box next to Show password. After that, you will be prompted to enter your administrator login and password. Do it and then hit Allow.
Final Thoughts…
And that’s about it! So, this concludes our in-depth guide about finding and sharing passwords of the known Wi-Fi networks in Ventura. From a usability point of view, it’s a worthy addition to macOS. Thus, I give it a thumbs up. Long story short, now, we no longer need to remember Wi-Fi passwords or use roundabout ways to share them with others. While macOS 13 may not seem to be a massive upgrade from the outside, it has packed a lot of goodies inside. Features like Stage Manager, the redesigned System Settings app, the ability to use iPhone as a webcam on Mac, and FaceTime Handoff that allows you to seamlessly transfer calls between iDevices have made the latest iteration of macOS a deserving upgrade. That said, what’s your take on Ventura? It would be a pleasure to have your thoughts in the comments below. You may also like to read: How to Use iPhone As Microphone on Mac
